One key feature of Microsoft’s Big Data Solution is solid integration of Apache Hadoop with the Microsoft Business Intelligence (BI) components. A good example of this is the ability for Excel to connect to the Hive data warehouse framework in the Hadoop cluster. This section walks you through using Excel via the Hive ODBC driver.
Install the Hive ODBC Driver
Prerequisites:
- Ensure that Excel 2010 64-bit is already installed before installing the HiveODBC Driver.
- Download the 64-bit Hive ODBC driver MSI file from the Portal by clicking the Download tile after logging into HadoopOnAzure.com
 .
. - Note, the HiveODBC driver includes both the HiveODBC Driver and the Excel Hive-AddIn.
- Double click HiveODBCSetupx64.msi to start the installation.
- Read the license agreement.
- If you agree to the license agreement, click I agree and Install.

Install the Microsoft Excel Hive Add-In
Prerequisites:
- Microsoft Excel 2010 64-bit
- 64bit Hive ODBC driver installed
- Start Microsoft Excel 2010 64-bit.
- You will be asked to install the HiveExcel add-in. Click Install.
- Once the add-in has been installed, click the Data tab in Microsoft Excel 2010. You should see the Hive Panel as shown in the screenshot below.

Create a Hive ODBC Data Source to use with Excel
- Click Start->Control Panel to launch the Control Panel for Microsoft Windows.
- In the Control Panel, Click System and Security->Administrative Tools->Data Sources (ODBC). This will launch the ODBC Data Source Administrator dialog.

- In the ODBC Data Source Administrator dialog, click the System DSN tab.
- Click Add to add a new data source.
- Click the HIVE driver in the ODBC driver list.


- Enter a data source a name in the Data Source Name box. For Example, “MyHiveData”.
- In the Host box , enter the host name of the cluster you created on the portal. For example, “myhadoopcluster.cloudapp.net”.
- Enter the username you used to authenticate on the portal.
- Click OK to save the new Hive data source.
- Click OK to close the ODBC Data Source Administrator dialog.
Using the Excel Hive Add-In
- Go to HadoopOnAzure.com and click Sign In to sign into your Hadoop cluster.
- Click the Open Ports tile to access port configurations for your cluster.


- Open Microsoft Excel 2010 64-bit.
- In Microsoft Excel 2010 64-bit, click the Data tab.
- Click the Hive Panel to open the Hive panel in Excel.
- In the drop-down list labeled Select or Enter Hive Connection, select the data source name you previously created.
- You will be asked to enter the password to authenticate with the cluster on the portal. Enter the password for the user name.
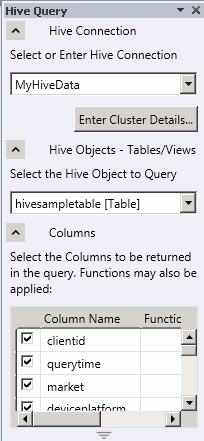
- In the drop-down list labeled Select the Hive Object to Query, select hivesampletable [Table].
- Select the checkbox for each of the columns in the table. The Hive Query panel should look similar to the following.

No comments:
Post a Comment